
Stunning Embroidered Design invites you into a world where fabric, thread, and imagination converge to create wearable art. This embroidered design tutorial blends practical hand embroidery techniques with creative planning, ensuring you build a polished piece from motif selection to finishing touches. You’ll discover a step-by-step embroidery guide to help you transfer ideas to fabric and choose stitches that add texture and depth. Whether you’re exploring beginner embroidery ideas or expanding your stitch repertoire, this introduction keeps the process approachable and rewarding. As you progress, you’ll see how balanced color, clean lines, and thoughtful layering bring your project to life, and you’ll learn embroidery stitches for design to add texture and depth.
Viewed through the lens of textile art, this guide describes the same craft using alternative terms, focusing on how threads, fabrics, and forms come together. It emphasizes motif planning, color harmony, and stitch selection as the core building blocks of a striking stitched artwork. From pattern transfer to sequence of stitches, the language shifts to broader concepts such as embroidery techniques, needlework methods, and fabric embellishment—LSI-friendly terms that help connect ideas across related topics. The aim is to present approachable, stepwise instruction that builds confidence in beginners while expanding the vocabulary used to discuss textile design.
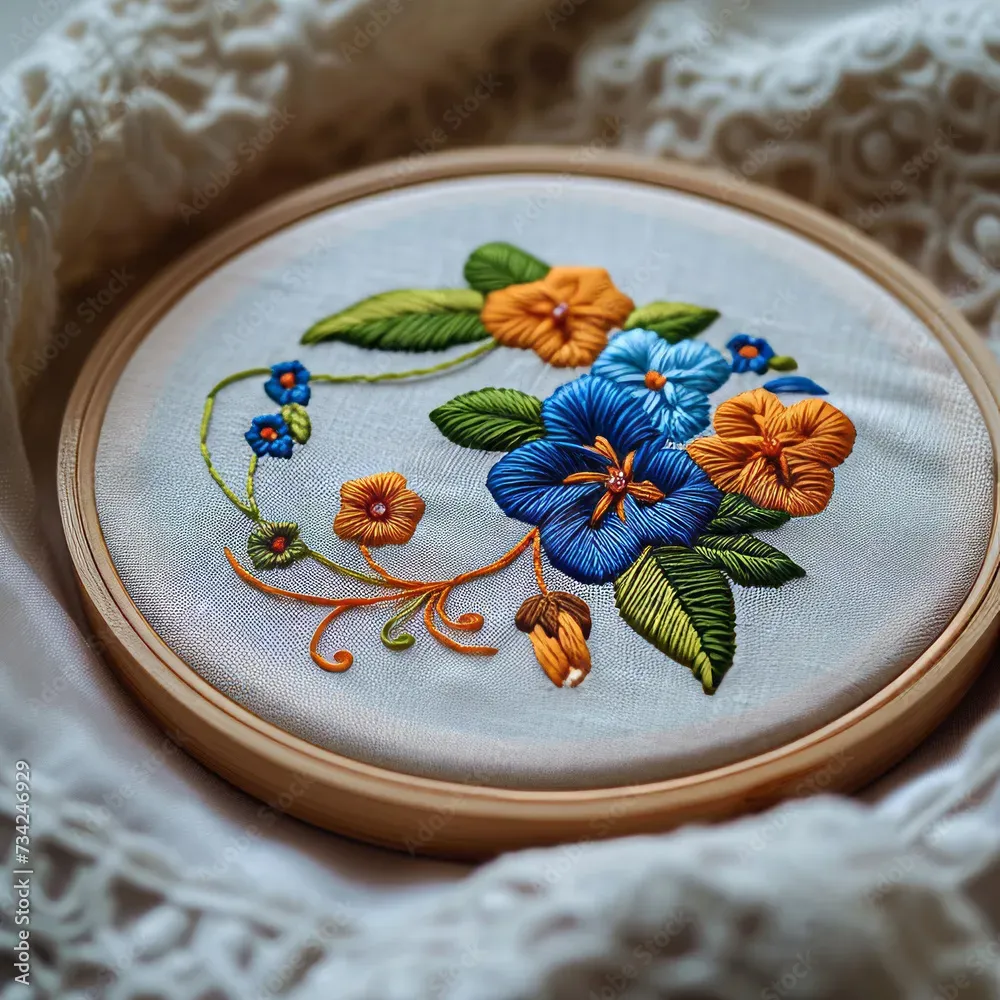
Stunning Embroidered Design: Planning a Captivating Motif
A stunning embroidered design begins with selecting a motif that speaks to you and fits your chosen hoop. Start with quick sketches, note the main shapes, and map where color will live. This aligns with what you’d find in an embroidered design tutorial: concept development before any stitch work begins. For beginners, keeping ideas simple boosts confidence and sets a clear direction for the project.
As you plan, consider hand embroidery techniques you’ll use to bring the motif to life. Think about how embroidery stitches for design will interact with fabric weight and color. A thoughtful plan—balanced composition, thoughtful color placement, and varied stitch types—prepares you for a smooth stitching session and a result you’ll be proud to show off.
From Transfer to Triumph: Mastering Accurate Motif Transfer
Transferring the motif accurately lays the foundation for a polished piece. Use transfer tools like water-soluble pens or tracing paper, and secure the fabric taut in the hoop before you begin. Checking alignment and proportions up front reduces wandering lines and keeps your stitches orderly, a principle you’ll also see emphasized in many step-by-step embroidery guides.
After tracing, test the transfer on scrap fabric if possible to confirm lines are clear and proportional. Make any necessary adjustments before you sew, because even small shifts can ripple into the final design. A precise transfer minimizes rework and helps your embroidery stitches for design remain clean and well-defined.
Color Play and Texture: Color Planning for a Stunning Embroidered Design
Color planning transforms a simple outline into a vibrant embroidered design. Choose a dominant color for the main shapes and one or two accents to add depth and contrast with the fabric. Think about harmony, shading, and how light will catch different thread tones—this approach mirrors the thoughtful decisions you’d make in a step-by-step embroidery guide.
Consider layering colors and selecting neutrals for outlines or subtle shading. This strategy fuels texture without overwhelming the piece, aligning with hand embroidery techniques that emphasize color interaction and thread variation. By planning your palette and stroke directions, you’ll amplify the design’s impact and achieve a balanced, gallery-worthy look.
Step-by-Step Embroidery Guide: Essential Stitches for Rich Texture
A practical, beginner-friendly sequence helps you build confidence through the core stitches. Start with a backstitch for clean outlines, then fill shapes with satin stitch, and add texture with long-and-short stitches. This section follows the ethos of a step-by-step embroidery guide, ensuring you learn practical stitches that form the backbone of any design.
To maintain cohesion, practice each stitch on scrap fabric first and keep tension even. As you master a few stitches—split stitch for details, chain stitch for decorative borders, and French knots for focal points—you’ll notice your final design reading more polished and professional. These embroidery stitches for design create depth while preserving a crisp, hand-crafted edge.
Hand Embroidery Techniques: Elevating Design with Layering and Shading
Layering colors and stitching directions brings depth and realism to your piece. Hand embroidery techniques come alive when you allow lighter threads to sit on darker bases, creating highlights and subtle shadows that make petals and leaves pop. This approach adds dimension without sacrificing the handmade charm.
Experiment with textures—seed stitches, French knots, lazy daisies—and observe how each stitch affects the overall look. By combining these hand embroidery techniques, you’ll add tactile interest and visual weight to your design, turning a flat surface into a rich, dimensional motif worthy of display.
Beginner Embroidery Ideas: Simple Starts That Grow with Confidence
If you’re just starting, choose beginner embroidery ideas that fit within a small hoop and a limited palette. Simple florals, geometric patterns, or tiny animal motifs provide clear practice goals and quick wins, reinforcing the idea that progress comes from consistent, focused practice. This pragmatic approach mirrors the early stages of an embroidered design tutorial.
As you complete your first pieces, you’ll naturally extend your skills toward more complex motifs. This journey echoes the structure of a broader step-by-step embroidery guide: practice, reflect, and progressively tackle richer textures and color schemes. With patience and personal style, your projects will evolve from straightforward exercises to expressive, finished designs.
Frequently Asked Questions
What is a Stunning Embroidered Design, and how can an embroidered design tutorial help beginners?
A Stunning Embroidered Design blends planning, technique, and finishing to transform fabric into art. An embroidered design tutorial guides you from motif selection to material prep, transfer, and stitching, helping you build skills with hand embroidery techniques. For beginners, start with simple motifs and follow a step-by-step embroidery guide to gain confidence and consistency.
Which embroidery stitches for design are essential in the step-by-step embroidery guide to creating a Stunning Embroidered Design?
In a step-by-step embroidery guide aimed at a Stunning Embroidered Design, core stitches like backstitch, satin stitch, long-and-short, split stitch, chain stitch, French knots, and lazy daisies form the foundation of the embroidery stitches for design. Practice these stitches on scrap fabric to learn control, tension, and stitch length, then apply them to your motif for texture and depth.
How do I plan materials for a Stunning Embroidered Design, and what beginner embroidery ideas should I consider?
Plan materials for a Stunning Embroidered Design by choosing stable fabric, appropriate stabilizers, a curated thread palette, a good needle set, a hoop, scissors, and transfer tools. This approach supports beginner embroidery ideas and aligns with simple hand embroidery techniques to keep the project approachable and tidy.
What is the best method for transferring a motif for a Stunning Embroidered Design according to a step-by-step embroidery guide?
For transferring a motif into a Stunning Embroidered Design, follow a methodical process in a step-by-step embroidery guide: print or trace the motif, secure the fabric in a hoop, and use water-soluble or graphite transfer tools. Check alignment frequently to keep elements centered and proportional.
How should I plan color and shading to maximize a Stunning Embroidered Design, using hand embroidery techniques or an embroidered design tutorial?
Color planning is key to a Stunning Embroidered Design. Start with a dominant color, add 1–2 accents, and consider a neutral for outlines. This approach complements hand embroidery techniques and an embroidered design tutorial by enabling depth without overwhelming color choices.
What common challenges may arise when stitching a Stunning Embroidered Design and how can I fix them using beginner embroidery ideas or hand embroidery techniques?
Common challenges include loose stitches, puckering, uneven edges, and color muddiness. Fixes are to check thread tension, keep the hoop taut, maintain consistent stitch lengths, use quality threads, and allow any transfer marks to dry. Following these tips with practice reinforces hand embroidery techniques and improves results.
| Aspect | Key Points | Notes / Tips |
|---|---|---|
| What makes a design stunning | Balanced composition, thoughtful color choices, clean stitch execution, and clever layering. Small details like stitch direction, thread variation, and spacing can elevate a design from ordinary to gallery-worthy. | Practice and patience refine technique over time. |
| Materials & planning | Fabric (stable, light color helps visibility); Stabilizer; Embroidery threads; Needles; Hoop/frame; Scissors and threader; Transfer tools. | Choose tools that suit your skill level and project needs. |
| Design motif & transfer | Start with a simple motif; fit it within the hoop; transferring accurately ensures clean results. | Use tracing paper or water-soluble pens; verify alignment in the hoop. |
| Color planning | Dominant color with 1–2 accent colors; include neutral outlines; plan highlights and shadows. | Example palette: soft teal petals, cream highlights, navy outlines. |
| Stitching steps | Outline with backstitch; fill shapes with satin stitch; add texture with long and short stitches; detail with split and chain stitches; texture with French knots and lazy daisies; layer colors; finishing touches; secure and trim. | Practice each stitch on scrap fabric first; maintain even tension and stitch length. |
| Finishing & care | Secure threads, trim ends; gentle washing and air-dry; iron from the back with a cloth barrier; frame or mount the piece. | Handle with care to preserve stitch integrity. |
| Common challenges | Looser stitches, puckering, uneven edges, color bleeding. | Check tension, keep fabric taut, use quality threads, allow adequate drying time. |
| Conclusion of process | Planning, materials, stitches, finishing lead to a stunning piece; practice builds skill and personal style. | Each project deepens technique and confidence in hand embroidery. |
Summary
Stunning Embroidered Design