
Color Theory for Embroidered Design is the compass that guides every decision from thread to fabric, turning mood, narrative, and texture into colors you can stitch with confidence and a thoughtful embroidery color palette. By understanding hue relationships, you can shape harmonies and contrasts that elevate your work, translating thread color theory into practical choices across fabrics, lights, and stitches, all guided by the color wheel embroidery mindset. This guide translates theory into actionable steps for selecting threads and building palettes, showing how to apply color relationships from the color wheel embroidery to real-world stitching decisions and how to approach palette planning for embroidery. You will learn to balance temperature, value, and saturation, using thread finishes and fabric undertones to maintain legibility and mood while avoiding common color pitfalls that dull or overpower a design, including how to manage contrast in embroidery. With a disciplined approach to testing swatches, recording your palette choices, and considering light and angle, you will gain confidence in turning inspiration into enduring, expressive embroidery.
Another way to frame this is to think of color choices as a language of light and texture that adapts to any fabric or stitch style. In needlework, color harmony arises from balancing hues, brightness, and saturation across your thread selections. Designers often talk about shade planning, pigment strategy, or palette choreography, focusing on how mood shifts when neutrals pair with bright accents. By considering context, lighting, and stitch texture, you can craft a cohesive textile palette that remains legible and expressive from near and far.
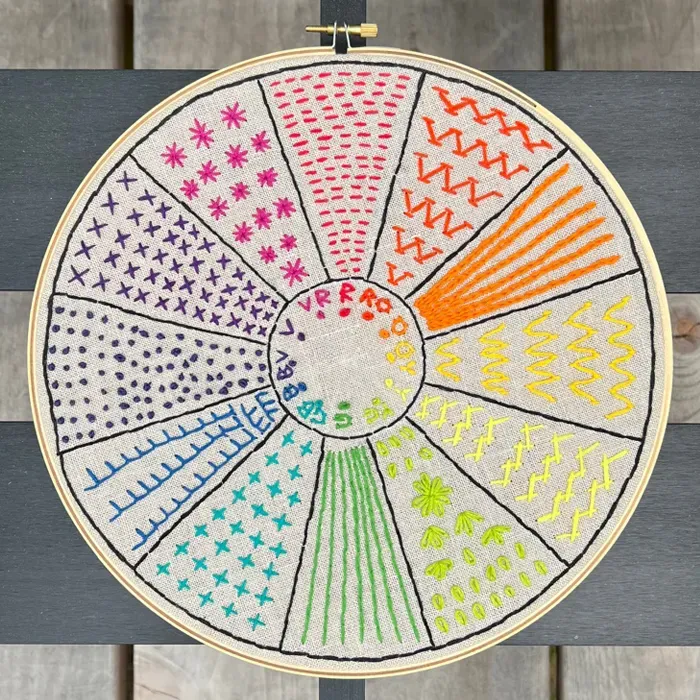
1) Understanding the Color Wheel and Color Relationships in Embroidery
The color wheel serves as a practical compass for embroidery, guiding how threads interact with fabric and light. Since embroidery threads reflect light differently than paint, understanding the wheel helps you predict how hues will read on real textiles. When you plan projects, think of color wheel embroidery as a starting point that informs harmony, contrast, and visual rhythm across stitches and textures.
In practice, mastering relationships on the wheel means deliberately choosing analogous palettes for calm, cohesive areas and employing complementary schemes to create focal pops. You can also experiment with triadic or tetradic combos to maintain energy without chaos. The goal is to translate wheel insights into fabric-friendly choices that respect value, temperature, and saturation, all while honoring the concept of contrast in embroidery.
2) Color Theory for Embroidered Design: From Theory to Palette
Color Theory for Embroidered Design is not just idea; it becomes a practical workflow for selecting threads and building an embroidery color palette. Start by articulating the mood and intended narrative, then translate that mood into a core set of neutrals and accents. This approach aligns with palette planning for embroidery, ensuring consistency across pieces and series as your skills grow.
To move from theory to execution, map out how the color relationships you’ve learned will appear on fabric. Choose a focal color and build supporting hues around it, using a color wheel embroidery strategy to balance warm and cool tones. Throughout the process, keep an eye on contrast in embroidery—value shifts, light reflection, and stitch density—as tools to deepen the composition while maintaining harmony.
3) Temperature, Value, and Saturation: Reading Light through Threads
Temperature, value, and saturation shape how threads read in different lighting and on various fabrics. Warm colors tend to advance toward the viewer, while cool colors recede, which you can leverage to create atmosphere or depth. When selecting thread color theory-informed choices, consider how the fabric undertone will influence perceived warmth and how the sheen of silk or viscose can shift saturation under daylight.
Managing value means using a range of light and dark threads to model form and space. Pair highly saturated hues with more muted tones to keep a composition from overpowering itself. This balance—alongside thoughtful consideration of contrast in embroidery—helps you craft dimension that remains legible from a distance and nuanced up close.
4) Practical Steps for Building a Harmonious Palette
Begin with mood and purpose, then assess the fabric you’ll stitch on. Define a core palette of 5–8 colors, mixing neutrals with 3–4 color accents to establish a flexible base. This structure aligns with palette planning for embroidery and creates a reliable anchor you can reuse across projects.
Next, design a light-to-dark gradient within your palette to enable shading and depth. Include a focal color that anchors attention, and think about finishes—matte cotton versus shiny silk—to modulate how colors read. Always test swatches on scrap fabric to verify how the palette behaves under real lighting and fabric textures, reinforcing your understanding of color wheel embroidery dynamics and contrast in embroidery.
5) A Floral Motif Case Study: Building a Cohesive Embroidery Color Palette
Imagine stitching a simple floral motif on oatmeal linen with a gentle, romantic mood. A core palette might include blush pink, sage green, soft peach, and taupe for branches, with a deep raspberry as the focal color. This setup demonstrates how a well-planned embroidery color palette can balance clarity with softness, using palette planning for embroidery as your guide.
As you proceed, develop shading with subtle value shifts—light pink highlights on petals and deeper raspberry edges—to add form. Use analogous greens for leaves to maintain harmony, and rely on a neutral for structure so the design doesn’t feel overloaded. This practical example shows how to translate color theory into a repeatable workflow that respects color relationships and the continuum of the color wheel embroidery concept.
6) Lighting, Viewing Angles, and Long-Term Color Performance
Color perception shifts with lighting and viewing distance, so test your palette under natural daylight and artificial light. The color wheel embroidery framework helps you anticipate how hues will adapt when moved across a room or viewed from different angles, guiding adjustments before final stitching. This awareness also informs how you document and reuse your palettes for future projects in a way that remains consistent with your embroidery color palette goals.
Finally, anticipate common pitfalls—overloading with color, neglecting fabric undertones, and skipping value planning—and counter them with deliberate swatching and light testing. By integrating palette planning for embroidery with ongoing testing, you’ll refine your ability to hold contrast in embroidery while preserving harmony, ensuring your pieces maintain their intended mood across lighting conditions and over time.
Frequently Asked Questions
How can Color Theory for Embroidered Design guide your embroidery color palette for a floral motif?
Use the color wheel embroidery framework to select an analogous or complementary palette. Build a core embroidery color palette of about 5–8 colors, include neutrals, and test swatches on your fabric to see how the palette reads in real light. This approach keeps the embroidery color palette cohesive and adaptable to different motifs.
What is thread color theory in Color Theory for Embroidered Design, and how should it influence fabric interactions?
Thread color theory explains how thread finishes, sheen, and translucency shift color perception on fabric. Choose thread tones that read as intended on your chosen fabric, and plan a light-to-dark gradient to guide shading and depth in your embroidery.
How can color wheel embroidery in Color Theory for Embroidered Design help you create contrast in embroidery?
Color wheel embroidery helps you create intentional contrast by pairing opposite hues for visual pop while adjusting value and saturation. Enhance contrast further with stitch density and light reflection to make the focal areas stand out.
What steps from palette planning for embroidery does Color Theory for Embroidered Design recommend for a cohesive look?
Define the mood, assess your fabric, build a core palette (about 5–8 colors) with neutrals, create a light-to-dark gradient, designate a focal color, consider thread finishes, swatch on scrap fabric, and document the palette for consistency across projects.
How should you apply color temperature, value, and saturation within Color Theory for Embroidered Design’s palette planning for embroidery?
Warm colors tend to advance and cool colors recede, so mix temperatures to control depth. Use a range of values to add shading and avoid flat results, and balance saturated hues with desaturated neutrals to maintain harmony across the embroidery.
What common pitfalls in Color Theory for Embroidered Design should you avoid when selecting an embroidery color palette?
Avoid overloading with color, ignoring fabric undertone, skipping value planning, and underestimating the effect of thread finish. Start with a restrained palette, swatch on the actual fabric, plan values, and test finishes to ensure a harmonious result.
| Key Point | Summary |
|---|---|
| Color Theory as a Practical Compass | Color Theory for Embroidered Design guides thread and fabric choices, defines mood and depth, and carries the narrative of a piece. |
| The Color Wheel and Color Relationships | The color wheel provides harmony and contrast frameworks for embroidery, recognizing that thread, light reflection, and viewing angle affect color perception. |
| Analogous Schemes | Neighbors on the wheel blend well for cohesive, soothing palettes ideal for large areas and serene looks. |
| Complementary Schemes | Opposing colors create high contrast and visual pop; effective when balanced with value and saturation, plus thread weight and stitch density. |
| Triadic and Tetradic Schemes | Three or four colors spaced around the wheel yield playful, energetic designs suitable for bold color without chaos. |
| Color Temperature, Value, and Saturation | Warm colors appear closer; cool colors recede. Use light-to-dark value ranges and balanced saturation to create depth and harmony. |
| Practical Steps for Choosing Threads and Building a Palette | A structured eight-step process: define mood; assess fabric; build core palette (5–8 colors); create a light-to-dark gradient; pick a focal color; consider finishes and luster; test swatches; document and reuse palettes. |
| Palette Planning for Embroidery | Start with neutrals, establish a color hierarchy, create intentional contrast beyond color, plan shading and highlights, integrate texture with color, and consider colorfast longevity. |
| Common Pitfalls | Overloading with color, ignoring fabric undertone, skipping value planning, and underestimating finish effects; swatching helps avoid these issues. |
| Practical Project Example: Floral Motif | A gentle mood example using a core palette (e.g., blush pink, sage green) with a focal raspberry color, showing mood-driven choices and gradient planning. |
| Lighting and Viewing Angles | Color shifts with lighting and viewing angle; test colors under multiple light sources and consider fabric texture when planning palettes. |
| Final Tips for Mastering Color Theory | Maintain a color journal, practice with small motifs, and study real-world samples to deepen understanding of color relationships in embroidery. |
Summary
Color Theory for Embroidered Design is a practical toolkit for turning ideas into visually compelling needlework. By understanding the color wheel, managing temperature, value, and saturation, and developing disciplined palette planning, you can craft embroidery that communicates mood with clarity and depth. Practice with swatches, test under varied lighting, and document successful palettes to build consistency across projects. Whether stitching delicate florals or bold geometric patterns, Color Theory for Embroidered Design guides thread choices and palettes toward cohesive, expressive embroidery.