
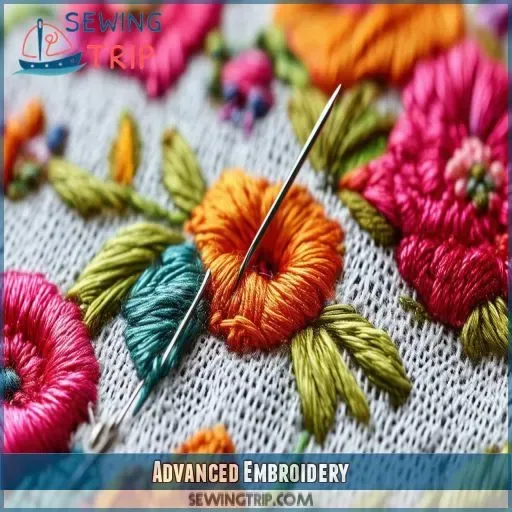
Advanced Embroidered Design Techniques unlock new possibilities for fabric art, blending layering, shading, and texture to move embroidery beyond simple stitches while inviting you to plan compositions that read as three-dimensional works on fabric, paper, or canvas, for ambitious makers. By applying embroidery layering techniques, artists build depth with stacked threads, subtle fabric interactions, and precise stabilizer choices, while careful use of embroidery shading techniques creates luminous, natural gradients that photograph and render well on the web. Textured embroidery stitches give tactile dimension, and designers can push the effect further with machine embroidery techniques for consistent results, or explore free-motion embroidery tips to sculpt forms by hand, achieving raised petals, veined leaves, and sculpted textures that invite close touch. This approach benefits both hobbyists and professionals, offering a practical framework to plan, execute, and troubleshoot layered motifs, shading, and surface textures, with checklists for materials, timelines, sample swatches, color references, and documented progress logs that keep the project on track. Read on to learn practical steps, from selecting stabilizers and threads to mapping a sequence that blends traditional handwork insight with modern machine strategies, ensuring you capture depth, glow, and realism across fabrics, garments, and home décor pieces worldwide.
For a fresh framing, consider elevated threadwork approaches that combine color, depth, and tactility to turn flat fabric into dimensional art. In LSI-informed framing, you can talk about dimensional stitching, layered ornamentation, and textural relief that echo shading gradients, multi-layer motifs, and sculpted surface design. This approach remains faithful to the craft while widening its appeal to readers and algorithms by emphasizing concept clusters rather than a single keyword. Whether you work with a sewing machine or free-motion control, the core ideas of layering, shading, and texture translate across methods and projects.
Frequently Asked Questions
What are the core steps to apply embroidery layering techniques within Advanced Embroidered Design Techniques to add depth to fabric art?
Plan layers on paper or a fabric swatch, then choose stabilizers and thread weights. Start with a crisp base fill and add successive layers with incremental stitches to build depth. Use embroidery layering techniques to separate foreground from background, and test on swatches to tune tension and fabric interaction before tackling the main piece.
How can you achieve realistic shading in Advanced Embroidered Design Techniques using embroidery shading techniques across multiple layers?
Plan a light to dark gradient across the form and select a cohesive color progression. Use directional stitching to follow contours, applying embroidery shading techniques across layers to create smooth transitions rather than abrupt changes. For machine embroidery techniques, small hue offsets can help top layers visually blend with lower layers, while hand work can enhance subtle graduations.
Which textured embroidery stitches are most effective for adding tactile dimension in Advanced Embroidered Design Techniques?
Use a mix of textured embroidery stitches such as satin with seed stitches, couching thicker threads, and raised decorative stitches to create tactile surface interest. Incorporate ribbon embroidery or metallic overlays for extra texture, and balance stitch density to preserve fabric structure and prevent puckering.
How do machine embroidery techniques compare with hand methods when practicing Advanced Embroidered Design Techniques?
Machine embroidery techniques provide reproducible layering and shading with consistent tension and speed, ideal for production work. Free motion or hand methods let you sculpt textures and micro textures with more control over line direction. Use stabilizers and appropriate feet for machines, and rely on careful guidance and practice for free motion to achieve dimensional results.
What free-motion embroidery tips help you sculpt volume and texture in Advanced Embroidered Design Techniques?
Free-motion embroidery tips include using a closed-toe foot, stabilizer beneath the work, and controlled movement with varying speed and pressure. Plan texture by adjusting stitch density and direction, and practice on swatches to map how layers interact. This approach helps you create raised shapes and subtle shadows for depth.
What common pitfalls should you avoid when combining layering, shading, and texture in Advanced Embroidered Design Techniques?
Watch for puckering, loose stitches, and over dense layers that flatten depth. Color bleed and muddy shading can reduce contrast, so pre test color blends on swatches. Always test your plan on fabric samples, choose appropriate stabilizers, and balance stitch density with open space to keep layering, shading, and texture harmonious.
| Topic | Key Points |
|---|---|
| Layering Techniques in Embroidery | Defines depth by stacking stitches, threads, and fabric interactions; plan layers from base fill to successive layers; consider stabilizers and thread weights; mix finishes for added depth; use sub-surface color to peek through; manage fabric stretch with firmer stabilizers to support later shading/texture. |
| Shading Techniques for Realistic Volume | Creates volume via color, stitch direction, and thread weight; plan smooth light-to-dark transitions to avoid abrupt changes; choose a light-to-dark color progression; use directional stitching to reinforce contours; works for both machine embroidery and hand embellishment. |
| Textures that Engage the Sense | Use varied stitches and materials to create tactile surfaces (e.g., satin + seed stitches, couching, metallic overlays); layer decorative stitches for sculptural texture; incorporate ribbon, beads, and multi-pass machine techniques to add dimension. |
| Practical Tools and Materials for Texture and Layering | Stable fabrics with clean weave; appropriate stabilizers (tear-away, cut-away, adhesive-backed); range of thread weights and finishes; suitable needles; short/dense vs. open fills; color contrast and negative space to enhance depth. |
| Design Planning and Workflow | Start with a motif that supports layering; create a color plan for cohesive shading; map steps: base fill → shading → texture → highlights; follow an efficient sequence; divide large designs into zones to reduce fatigue and ensure even depth. |
| Practical Examples: Projects to Try | Flower panel with layered shading; leaf motif with venation and raised texture; start with light satin fill, add darker shading, and finish with texture stitches and subtle shimmer thread. |
| Common Pitfalls and How to Avoid Them | Puckering, loose stitches, over-dense layers; prevent with proper stabilizer support and tension adjustments; test on swatches; guard against color bleed by pre-testing blends; consider a light separation line for sharp gradients. |
| A Note on Hand vs. Machine Techniques | Machine embroidery enables reproducible layering and shading; free-motion or hand techniques allow sculpting textures; combining both approaches offers versatility and better control. |
| Conclusion | Advanced Embroidered Design Techniques—layering, shading, and textures—offer a pathway to richer, more expressive fabric art. By planning composition, selecting threads and stabilizers, and choosing purposeful stitch types, you can build depth that engages the eye and invites touch. Practice on swatches, test color gradients, and document results to refine your process over time. With patience and experimentation, your embroidered designs will graduate from decorative motifs to immersive works that celebrate texture, color, and dimension. |