
DIY Embroidered Denim offers a stylish way to refresh old jeans or customize a new pair with personalized flair, whether you’re revamping a closet staple or starting a fun weekend project. Embroidery on denim blends color, texture, and craft into one wearable project, with embroidered denim ideas ranging from botanical motifs to geometric shapes that suit every mood, season, and wardrobe. Whether you’re a sewing hobbyist or a complete beginner, you can approach this with confidence, exploring hand stitching on denim alongside simple stitches, transfers, and quick designs that build skill. This guide covers practical tips to help you start with confidence, from design ideas and pattern transfer to choosing the right tools, stabilizers, and thread weights that prevent puckering. Along the way, you’ll see how the craft on denim can go from subtle accents to bold statements, letting you tailor each project to your style and lifestyle for you.
Beyond the introductory tips, this craft unfolds as denim embellishment that blends artistry with everyday wear. Think of denim embroidery as durable decoration, a way to personalize jeans with stitch-based embellishment and textile art that fits casual wardrobes. Whether you lean toward delicate hand stitching or machine-assisted detailing, you can balance speed with control by choosing the right needles, stabilizers, and fabrics to keep seams strong over time. In this light, the project becomes about creative problem-solving and technique, inviting you to experiment with color, texture, and layout while keeping care and maintenance in mind.
DIY Embroidered Denim: Creative Ways to Personalize Jeans and Jackets
DIY Embroidered Denim lets you turn old jeans into one-of-a-kind pieces with personal flair. This approach blends color, texture, and craft into a wearable project that can match any style—from minimalist to maximalist. Whether you’re a seasoned sewer or a total beginner, starting with clear ideas and simple stitches makes the process enjoyable. Embracing DIY Embroidered Denim also supports sustainable fashion by reimagining existing pieces.
With the right mindset, you can tailor each project to your lifestyle—whether you want subtle accents or bold statements. Embroidery on denim blends line work, color blocking, and texture to create visual interest that moves with you. This guide covers pattern transfer, tool choice, and stitch planning so you can build confidence as you work.
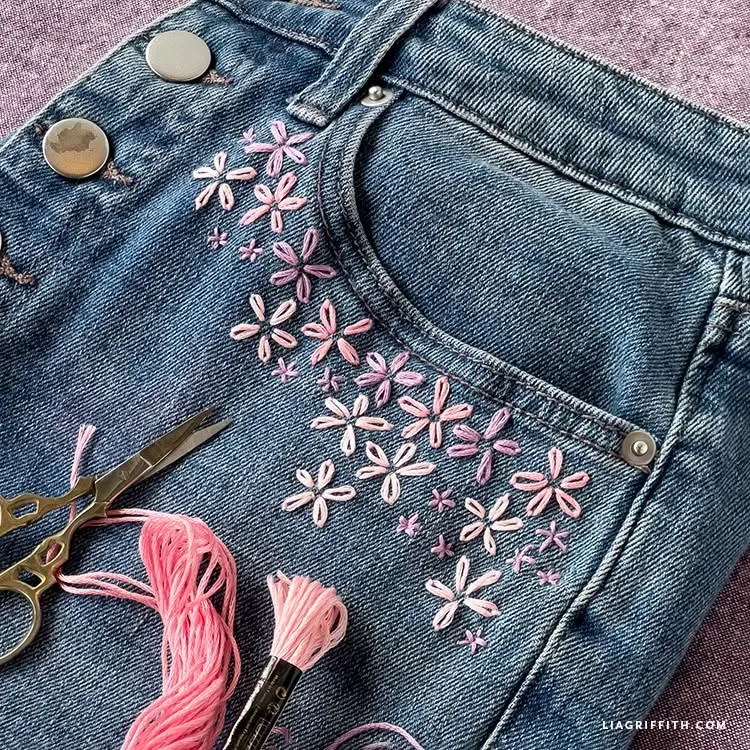
Embroidered Denim Ideas: Motifs, Color, and Placement
Embroidered denim ideas range from botanical outlines to geometric bursts, letting you tailor a look to casual everyday wear or chic upcycled outfits. Start by selecting a focal motif—flowers, leaves, or a simple monogram—and plan placement along a pocket edge, down a leg seam, or on the back yoke. A thoughtful placement strategy helps your embroidery look intentional rather than accidental.
Color choice matters as much as the design itself. High-contrast threads pop, while tonal shades provide subtle texture. Layering threads of different weights can add depth, or mix embroidery on jeans with patches for a mixed-media effect. Practice with small samples to refine color balance and stitch density before committing to a full garment.
Hand Embroidery on Jeans: Beginner Stitches for Texture and Durability
Hand embroidery on jeans rewards patience and tactile feedback. Start with basic stitches like backstitch for clean outlines and satin stitch for filled shapes, then add French knots for centers or accents. Since denim is sturdy, choose stitches that won’t pull on stressed seams, and reinforce problem areas with a light stabilizer if needed.
Map a small motif to your jeans and practice on a scrap before moving to the actual project. Hand embroidery on jeans lets you savor a slow, mindful process while building confidence in stitch control. By starting small, you’ll learn tension and spacing, laying a solid foundation for more complex designs later.
Machine Embroidery on Denim: Tools, Settings, and Durable Finishes
Machine embroidery on denim can deliver intricate patterns quickly, provided you use the right setup. Use a denim needle, a sturdy weight stabilizer, and a hoop that minimizes fabric movement to prevent puckering. Digital designs or built-in motifs enable precise edges and repeatable motifs across multiple jeans or panels.
Plan to adjust stitch density and thread tension to suit dense fabrics. When done carefully, machine embroidery on denim yields professional finishes and long-lasting durability, making it ideal for larger motifs or repeated designs on jackets, pockets, or seams.
Pattern Transfer and Tools for Embroidered Denim: From Paper to Fabric
Pattern transfer is the bridge between your design ideas and stitched reality. Methods like light pencil tracing, water-soluble pens, iron-on transfers, or printable templates each offer different convenience levels for denim. Start with a simple motif to practice the transfer process while testing how the lines respond to stitching.
Choose the transfer method that keeps lines visible long enough to stitch while remaining easy to remove. Pair this with the right tools—pattern paper, erasable pens, and accurate hoops or stabilizers—to ensure your embroidery aligns with seams and pockets without distortion.
Care, Maintenance, and Troubleshooting for DIY Denim Embroidery
To keep embroidered denim looking fresh, follow gentle care steps such as turning jeans inside out before washing, using cold water and a mild detergent, and air drying when possible. This aligns with best practices for DIY embroidery on jeans to preserve color and stitch integrity over time.
Common issues like puckering or thread breaks can be addressed with a few quick fixes: add or adjust stabilizers, choose the correct needle size, and recheck tension. When a stitch goes awry, re-hoop and re-thread, then revisit your design to adjust density and stitch length for a durable, long-lasting finish.
Frequently Asked Questions
What is DIY Embroidered Denim and why should I try it?
DIY Embroidered Denim is a stylish way to refresh jeans or customize a new pair with personal flair. It blends color, texture, and craft on denim and is approachable for beginners who want to explore both hand embroidery on jeans and machine embroidery on denim. Start with simple motifs and transfer patterns to build confidence with a few basic stitches.
What tools are essential for DIY embroidery on jeans?
For DIY Embroidered Denim, gather a sturdy denim piece (jeans or jacket), embroidery floss or pearl cotton, needles (size 7–9), sharp scissors, a stabilizer, an embroidery hoop or magnetic hoop, an erasable pen or chalk, and a sewing machine with a suitable embroidery foot for machine embroidery on denim. If you plan heavier designs, add a wash-away stabilizer and consider denim needles to reduce puckering.
What are some embroidered denim ideas for beginners?
Embroidered denim ideas include simple flowers or leaves along a pocket edge, a small monogram on a thigh, or geometric motifs down a leg seam. Start with a single motif to master transfer and stitching before layering more design elements, which helps with DIY Embroidered Denim.
How do hand embroidery on jeans and machine embroidery on denim compare in a DIY project?
Hand embroidery on jeans is forgiving, tactile, and great for learning stitches, but can be slower. Machine embroidery on denim offers speed and precision but requires stabilizers, the right needle, and a machine with embroidery capability. Both approaches work for DIY Embroidered Denim; choose based on your skill, timeline, and design complexity.
How do you transfer patterns for DIY Embroidered Denim designs?
For pattern transfer, use a light pencil tracing, a water-soluble pen, iron-on transfer, or printable templates. Secure the fabric with a hoop or stabilizer, then begin stitching. These methods help ensure clean outlines for DIY Embroidered Denim projects.
How should you care for DIY Embroidered Denim to keep stitches looking fresh?
Turn jeans inside out before washing, use cold water and a mild detergent, and air dry when possible. Avoid chlorine bleach and minimize heat in the dryer. If threads loosen, re-tighten with a small backstitch to maintain the look of your DIY Embroidered Denim.
| Section | Key Points |
|---|---|
| Introduction | DIY Embroidered Denim refreshes jeans; embroidery blends color, texture, and craft; suitable for beginners; covers design ideas, pattern transfer, tools, stitches, and tailoring to style. |
| Tools and Materials | Sturdy denim (jeans or jacket); embroidery floss/pearl cotton; embroidery needles (size 7–9); sharp scissors and tracing tools; stabilizer; embroidery hoop or magnetic hoop; erasable pen or chalk; sewing machine with embroidery foot for machines. |
| Design Ideas & Pattern Transfer | Designs range from botanical motifs to geometric shapes and monograms. Beginners start with simple shapes; transfer methods include pencil tracing, water-soluble pen, iron-on transfers, and printable templates. |
| Techniques: Hand & Machine | Hand embroidery is forgiving and tactile for beginners; common stitches include backstitch, satin stitch, and French knot. Machine embroidery offers speed and precision with denim needles and stabilizers; use digitizing designs or built-in options and a machine embroidery foot. |
| Designing a Stitch Plan | Map colors and order before stitching; decide outlines first, fills later, or a mix; plan for contrast and depth to reduce undoing stitches. |
| Step-by-Step Project: A Simple Floral Patch | Begin with a small floral motif on a pocket or thigh. Hoop and stabilize. Outline with backstitch, fill petals with satin stitch, add leaves with stem or outline stitches, center with French knots, remove stabilizer, wash and press. |
| Care & Maintenance | Turn inside out before washing; use cold water and mild detergent; avoid chlorine bleach; air dry; low heat if dryer; re-tighten threads with small backstitches if needed. |
| Troubleshooting & Tips | Puckering: add stabilizer or reduce stitch density; thread breaks: change needle and check thread path; fraying: secure edges with satin stitch; uneven stitches: check tension and hoop rigidity; patience is key. |
| Conclusion | DIY Embroidered Denim combines creativity with practicality, guiding designers from idea to finished piece while adapting to skill level. Start simple, practice, and gradually take on more complex patterns to build confidence and personal style. |
Summary
DIY Embroidered Denim offers a versatile path to personal expression through fabric art. By selecting thoughtful design ideas, mastering transfer methods, and combining hand embroidery with machine embroidery on denim when appropriate, you can create denim pieces that reflect your unique style. Start with a simple motif, practice a few stitches, and gradually expand to more intricate patterns. Whether you’re refreshing old jeans or customizing a new pair, the joy of crafting something one-of-a-kind makes every stitch worthwhile. Remember the core idea: with the right tools, a clear plan, and a little creativity, denim becomes a canvas for your imagination, and DIY Embroidered Denim becomes a daily expression of you.