
Embroidered patches offer a tangible way to tell stories on fabric, turning everyday garments into wearable art that you can proudly showcase. From jackets to backpacks, these durable canvases bring color, texture, and personality to your wardrobe, making simple outfits feel uniquely yours. This guide covers patch design ideas, how to apply patches, and care for embroidered patches to help you produce badges that last through countless washes and seasons. If you’re pursuing custom embroidered patches for a team, club, or product line, knowing the basics saves time, reduces waste, and keeps your branding consistent. For flexible installation and long wear, consider iron-on patches as a quick option, while sew-on methods offer added security and repair-friendly durability.
Beyond the term embroidered patch, think of these stitched emblems as versatile fabric badges that anchor branding, teams, or personal style across apparel and accessories. Designers and buyers often search using alternative terms such as textile patches, sewn badges, decorative embroidery, or fabric insignias, which helps content align with related queries. This broader framing supports discovery while keeping the topic approachable for beginners and pros alike, whether you’re ordering in bulk or producing a limited run. By embracing varied terminology, you connect with Latent Semantic Indexing signals that mirror how people think about these embellishments and where to find design, tooling, and supplier guidance.
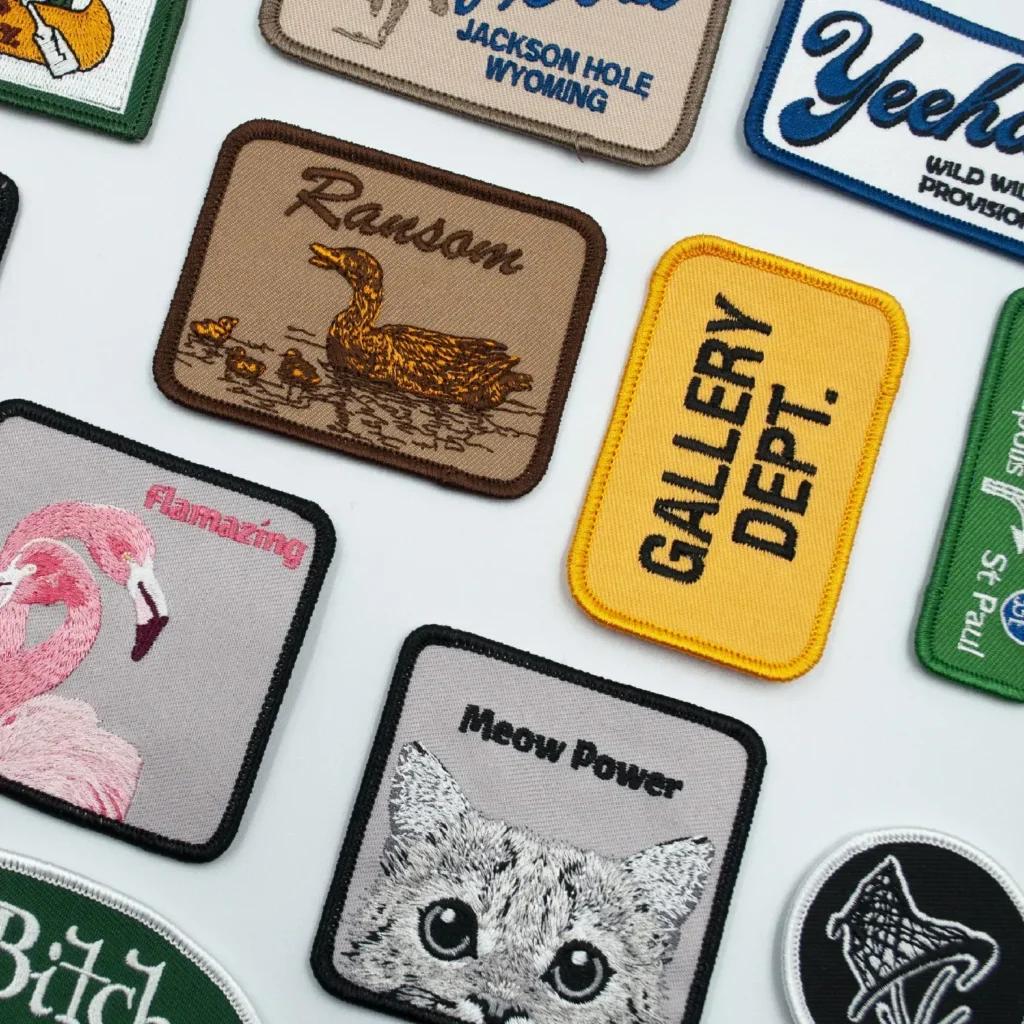
Embroidered patches: Design ideas that stand out
Embroidered patches are small canvases where color, shape, and texture tell a story. When exploring patch design ideas, focus on clean lines, legible elements, and a color palette that reproduces well on fabric. Consider patch size, backing, border style, and thread type to ensure legibility from a distance and durability after multiple wash cycles.
Develop a cohesive patch collection by selecting a shared color system and a consistent border theme. Start with a distinctive centerpiece for each patch, then build supporting elements around it, ensuring the design remains striking on common fabrics like denim, twill, or canvas. Where possible, specify Pantone colors or color-matching to keep batches consistent across production runs.
Patch design ideas: From concept sketches to production-ready art
From rough sketches to production-ready art, patch design ideas come to life with vector math and precise color control. If you don’t have vector artwork, collaborate with a designer to convert raster art into AI, EPS, or SVG formats for clean edges and accurate color replication. Establish a precise color palette, including PMS codes, to minimize surprises in manufacturing.
Plan for embroidery density, border shapes, and backing choices early. A Merrow border provides a classic finish, while heat-cut or felt borders offer a modern aesthetic. Choose backings such as iron-on, sew-on, or non-adhesive options based on how the patches will be used and washed, ensuring the final piece holds up over time.
How to apply patches: Iron-on and sew-on methods explained
How to apply patches begins with proper preparation. Pre-wash the garment to remove finishing chemicals, then position the patch and apply heat with parchment or a protective cloth. Iron-on patches typically require 20–30 seconds of steady pressure at a high temperature, followed by a cool-down to set the bond. For best results, test on a small area first.
For sew-on patches, align the patch and pin it in place before stitching. Use a sharp needle and strong thread to sew around the edge with tight, consistent spacing, typically 1–2 mm. A backstitch at key points and interior cross-stitches can increase durability, especially on items that will be laundered or subjected to heavy wear.
Care for embroidered patches: Longevity through proper maintenance
Care for embroidered patches begins with understanding how washing and drying affect the stitching. Follow garment care labels and opt for a gentle cycle with cool or warm water, turning patches inside out to reduce abrasion. Air-drying is ideal, but if you must use a dryer, select a low heat setting to minimize edge wear and color fading.
Inspect patches after washing and trim any loose threads. If needed, resecure edges with a quick stitch or reinforce with a light edgestitch. Proper maintenance helps patches retain their texture, color, and shape much longer, keeping them looking professional through many wash cycles.
Custom embroidered patches: From concept to customer
Custom embroidered patches turn branding, teams, and events into tangible artifacts. The process begins with clear artwork and file formats; vector AI or EPS files are ideal, but designers can convert raster art to preserve sharp lines and color accuracy. Demonstrating color fidelity through proofs helps ensure your patch matches your vision.
Discuss packaging, labeling, and minimum order quantities with vendors. If your project is small, ask about sample runs or smaller batches. Outline lead times, production milestones, and quality checks, and ensure you have a clear agreement on edge quality, backing options, and overall presentation to the customer.
Iron-On Patches: Quick-start guide for beginners
Iron-on patches offer quick customization for clothing, bags, or gear without sewing. Start with high-quality patches on fabrics that tolerate heat. Test on an inconspicuous area to ensure the adhesive bonds firmly and does not stain or warp the material.
To maximize performance, follow the manufacturer’s instructions for heat, pressure, and dwell time, and consider a dual backing if you want the option to sew later. When in doubt, choose fabrics with stable weave and avoid high-friction areas to prevent peeling or distortion over time.
Frequently Asked Questions
What are embroidered patches and where can I use them?
Embroidered patches are small, durable canvases that let you tell a story, showcase a brand, or celebrate a hobby. They can be added to jackets, backpacks, denim, hats, one-offs, or mass-produced for events and teams. They’re a versatile way to personalize clothing or gear, and you can design custom embroidered patches to fit your project.
Patch design ideas for embroidered patches: how do you start?
Designing embroidered patches starts with a clear concept and practical constraints. Patch design ideas should balance aesthetics with manufacturability—use clear lines, legible text, and a high-contrast color palette. Consider patch size (common ranges from 1–2 inches to 4–6 inches), border style (Merrow, heat-cut, or felt), backing options, and thread type. For production, prepare vector artwork, specify color codes (Pantone), and review a digital proof before stitching.
How to apply patches: iron-on vs sew-on?
Iron-on patches are quick to apply and come with a heat-activated backing. To apply: pre-wash the fabric, place the patch, cover with parchment, and press with a hot iron for 20–30 seconds until the adhesive sets. Let it cool to set, then optionally stitch around the edge for extra security. Sew-on patches are secured with stitching for durability and can be used on fabrics that aren’t heat-safe. Steps: position, pin, sew around the edge with a tight stitch (about 1–2 mm spacing); add backstitch at key points if needed.
Care for embroidered patches: how should I wash and maintain them?
To keep embroidered patches looking sharp, wash patches inside out on a gentle cycle with cool or warm water. Air-dry when possible; if you use a dryer, choose a low heat setting. Avoid ironing directly on the patch surface unless it’s an iron-on type and you follow recommended instructions. After washing, inspect for loose threads and trim or resecure as needed.
Custom embroidered patches: what should I plan before ordering?
Custom embroidered patches help reinforce branding, celebrate teams, or commemorate events. Plan size, design complexity, backing, and order quantity, as these factors determine cost and lead time. Provide vector artwork (AI/EPS) or have a designer convert raster art, request proofs to verify color and edge quality, check minimum order quantities, and decide on packaging and labeling.
Iron-On Patches: Quick-Start Guide for Beginners
Iron-on patches are beginner-friendly for personalizing clothing, backpacks, or gear without sewing. Start with high-quality patches on compatible fabric and test on an inconspicuous area first. Apply with a hot iron for 20–30 seconds, then let cool; if edges lift, reapply heat or stitch around the edge for extra security. For fabrics that aren’t heat-safe or for items that will be washed frequently, use sew-on patches instead.
| Aspect | Key Points |
|---|---|
| What are embroidered patches? | Small, durable canvases that tell a story, showcase a brand, or celebrate a hobby; can be added to jackets, backpacks, denim, hats; designed from concept to stitching to washing for lasting, professional results. |
| Common uses | One-offs or mass-produced patches for events, teams, clubs, products, or personal accessories like totes. |
| Design goals | Balance aesthetics with manufacturability; clear lines, legible text, and a color palette that reproduces well on fabric; consider size, backing, border, and thread type. |
| Patch size & shape | Common sizes range from 1–2 inches to 4–6 inches; shapes include circular, oval, shield, and custom contours; clean silhouette aids readability and production. |
| Detail density | Fine lines can blur if the patch is too small; simplify complex graphics for patches under 2 inches; higher embroidery density yields bolder visuals but requires more stitches and can raise production costs. |
| Border & backing | Merrow borders (overlock edges) provide a classic finish; heat-cut or felt borders offer a modern look. Backing options include iron-on, sew-on, or non-adhesive backings suitable for hand-sewing. |
| Color management & typography | Use a limited, high-contrast palette; Pantone color matching when possible; bold, readable typefaces; keep text short to maintain legibility at small sizes. |
| Materials & durability | Polyester thread is durable and colorfast; rayon offers a softer sheen but may require gentler care; consider fabrics like twill, felt, or velour backing to complement the design. |
| Production steps | Concept sketch or digital art; convert raster to vector (AI/EPS/SVG); establish a precise color palette (PMS); determine dimensions and backing; create a production proof before stitching. |
| Backing options & application | Iron-on, sew-on, or both; follow proper application methods and test on fabric; choose backing based on fabric and wash needs. |
| Care & longevity | Wash inside out on gentle cycles; air-dry when possible; avoid direct ironing on patch surface unless iron-on and following instructions; trim loose threads and resecure as needed. |
| Custom patches & vendor considerations | Provide vector artwork when possible; request proofs; know minimum order quantities; plan packaging and labeling; consider sample runs for small projects. |
| Iron-on patches (quick-start) | Begin with high-quality patches and compatible fabric; test on an inconspicuous area; follow heat/pressure guidelines for best bond. |
| Troubleshooting | Loose edges, fading colors, peeling, warping; adjust heat, pressure, and backing; test on similar fabric; use colorfast threads and proper washing. |
Summary
Conclusion: Embroidered patches offer a timeless way to celebrate identity, creativity, and collaboration. From initial design and patch design ideas to the application process and ongoing care, the journey from concept to cherished accessory is approachable for hobbyists and professionals alike. By selecting the right backing, refining the design for legibility and durability, and following best practices for care and maintenance, you can build a patch collection that looks deliberate and feels durable. Whether you choose iron-on patches for easy customization or sew-on patches for maximum longevity, your embroidered patches will tell your story with color, texture, and character for years to come. If you’re ready to explore more, start with a few simple patch design ideas and test different backings on compatible fabrics. As you gain experience, you’ll refine your process and produce custom embroidered patches that stand out in any crowd, whether as a personal hobby or a professional branding tool.