
The custom patches process turns ideas into wearable art, weaving storytelling with craft. From embroidery patches used on uniforms to fashion patches on streetwear, patches celebrate identity and mark milestones with tactile texture. In practice, the journey moves from concept to creation of patches, guided by a clear design brief and practical constraints. This descriptive guide outlines the patch design process, balancing aesthetics with the realities of patch production, durability, and client feedback. By tracing steps from ideation through to QC, creators can deliver consistent, high-quality results that wear well over time.
Seen from a broader perspective, the journey from idea to finished badge mirrors other branding workflows, moving from sketches to stitch-ready files and final finishes. Design teams and clients alike value a collaborative cadence that aligns aesthetics with production realities, ensuring color accuracy and durable backing. Whether the badge goes on team kits, corporate apparel, or streetwear, the path links concept creation with practical constraints, turning imagination into market-ready accessories. The emphasis on sampling, proofing, and supplier partnerships keeps quality predictable across runs. In essence, the design-to-delivery pipeline for patches echoes the broader process of turning artwork into wearable branding.
1) Understanding the Custom Patches Process: From Concept to Creation of Patches
The custom patches process is the journey that turns an idea into a tangible wearable. It begins with a clear concept brief, a defined audience, and practical constraints, then follows a deliberate sequence toward a finished patch. This approach helps teams align expectations, manage timelines, and communicate effectively with clients, ensuring that every decision serves both aesthetics and function. By framing the effort as a progression from concept to creation of patches, stakeholders stay focused on the outcome and the story the patch will tell.
In practice, this journey spans ideation, design, material selection, production method choices, prototyping, and quality control. Whether the final product is an embroidery patch or a printed patch, the core elements—concept, digitized artwork, backing, finishing, and testing—remain consistent. Understanding this structured flow helps brands and creators plan efficiently, reduce risk, and deliver patches that meet real-world needs and timelines.
2) Design and Digitization: The Patch Design Process for Embroidery Patches
Design and digitization form the backbone of the patch design process. Once a concept proves viable, artwork is translated into vector graphics and color maps, with embroidery patches requiring specialized digitization that creates stitch instructions for machines. The digitization phase accounts for stitch types, density, underlay, and stabilizers to ensure clean edges, durable coverage, and faithful color reproduction. Digital previews offer a risk-free way to assess how the design behaves on fabric and at different patch sizes.
Even for printed patches, high-resolution artwork and precise color management are essential to reproduce gradients and fine lines. The goal is to maintain legibility and brand integrity across scales while considering fabric type, backing, and laundering realities. This stage—often iterative—bridges artistic intent with manufacturing feasibility, ensuring the final embroidery patches or printed patches align with the original concept and the customer’s expectations.
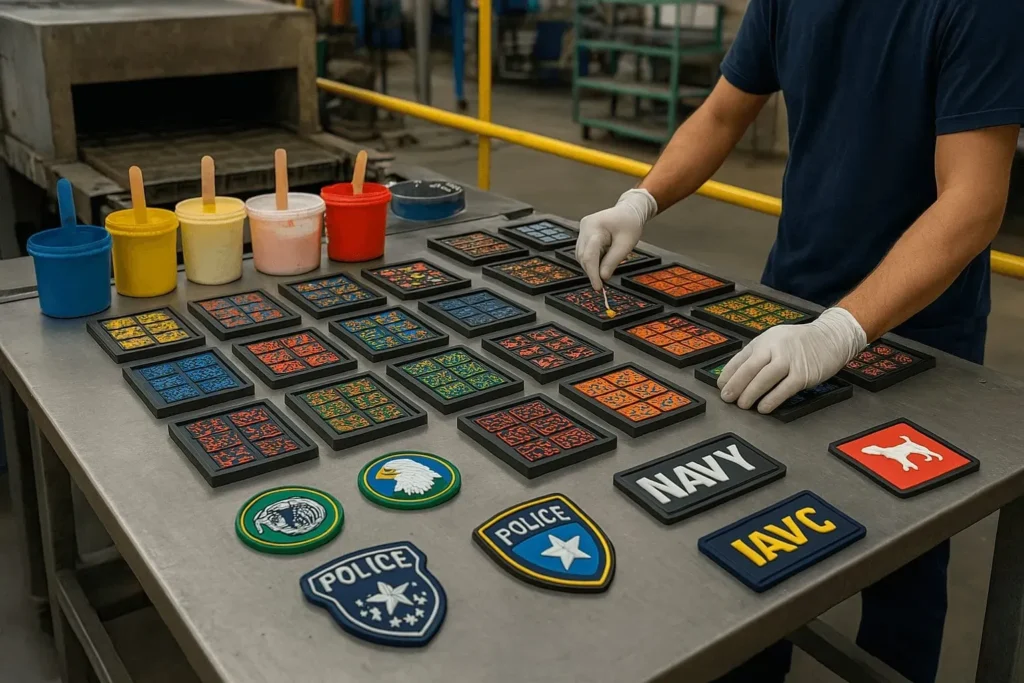
3) Materials, Backing, and Finishing: Textures, Stabilizers, and Edge Finishes
Material selection defines the texture, weight, and wearability of patches. Options such as cotton twill, felt, polyester, and velvet offer distinct looks and performance characteristics. Backing choices—iron-on, sew-on, or velcro-backed—affect installation speed, durability, and end-user experience. Finishing touches like edge stitching, merrow or laser-cut borders, and coatings influence both aesthetics and longevity.
The finishing stage also considers backing stability and laundering expectations, along with any embellishments such as metallic threads or glow-in-the-dark elements. A thoughtful material mix ensures compatibility with the intended application, garment care, and user interaction. The right combination of fabrics, backings, and edge finishes helps keep patches looking sharp through repeated washing and wear.
4) Production Methods: Embroidery vs. Printed Patches and How They Shape Patch Production
The two most common formats—embroidery patches and printed patches—each follow distinct production pipelines and visual languages. Embroidery patches offer a tactile, premium feel and are highly durable, making them popular for uniforms, clubs, and traditional branding. The patch design process for embroidery centers on stitch count, pull compensation, color separations, and hooping considerations to preserve legibility at multiple sizes.
Printed patches rely on dye-sublimation or direct-to-film printing, which enables photorealism and intricate gradients that are difficult to achieve with thread alone. The choice between embroidery and print affects cost, lead times, laundering care, and overall usability. Testing patches on similar fabrics becomes a vital phase in patch production to ensure resilience under real-world wear and washing cycles.
5) Prototyping, Approval, and Quality Control: Validation at Every Stage
Prototyping is essential to verify design, color accuracy, texture, and scale before full-scale production. Producing multiple prototypes allows stakeholders to see how stitching density, edge finishes, and backing interact with specific fabrics. Feedback from brand teams, clubs, or individual customers drives refinements to the design or materials, reducing risk and aligning the final product with expectations.
Quality control, color management, and consistency are woven into every phase of production. Regular machine calibration, hooping accuracy, and tension checks help maintain uniform results across batches. A robust QC checklist flags misalignments, missing stitches, or color shifts early, preventing costly reprints and delays and ensuring that both embroidery patches and printed patches meet long-term performance standards.
6) Customization, Lead Times, and Long-Term Partnerships for Scaled Patch Programs
One of the biggest advantages of patches is the ability to customize. Brands may request multiple sizes, different backings, or a mix of embroidery and printed elements within a single product family. Lead times vary with complexity, quantity, and materials, with smaller runs often delivering quickly and larger orders requiring more planning, sampling, and factory scheduling.
Building long-term partnerships around patch production ensures consistency across campaigns and seasons. A reliable partner handles creative collaboration, scheduling, and logistics, helping teams scale from concept to creation of patches while maintaining quality and cost control. Emphasizing sustainability, supplier alignment, and ongoing communication supports ongoing success for organizations that rely on patches for branding, membership recognition, or merchandise.
Frequently Asked Questions
What is the custom patches process and why is it important from concept to creation of patches?
The custom patches process is a structured journey from concept to creation of patches that guides design, digitization, material selection, production, and QC. It ensures the patch meets brand identity, durability, and manufacturing realities for both embroidery patches and printed patches.
How does the patch design process move from concept ideation to production-ready patches?
It begins with a concept brief, translates into sketches, then digitization and color mapping, with digital previews to verify how the patch will look on fabric. This approach applies to both embroidery patches and printed patches before production.
What factors influence patch production for embroidery patches versus printed patches?
Embroidered patches focus on stitch count, density, underlay, and thread colors; printed patches emphasize high-resolution artwork and color management. In both cases, you test, approve, and QC before patch production.
How do materials, backing, and finishing impact the durability and wearability of custom patches?
Materials like twill, felt, or polyester define texture and wear; backings such as iron-on, sew-on, or Velcro affect installation and durability; edge finishes and coatings affect longevity and washability.
What happens during prototyping and approval in the patch production workflow?
Prototypes test design, color accuracy, texture, and scale on representative fabrics; stakeholders review and approve or request revisions before full patch production.
How are color management and quality control integrated into the custom patches process?
Color management ensures consistent hues across batches via swatches and proofs; quality control checks machinery tension, hooping, stitching, edge finishing, and adhesion to fabrics throughout patch production.
| Stage | Focus | Key Points | Notes / Examples |
|---|---|---|---|
| Step 1: Concept and Ideation | Initial concept, audience, constraints | Translate the brief into sketches; explore shapes, motifs, typography; align with brand identity; consider embroidery vs. print limitations | Rough concepts establish direction and emotional tone; determine suitable embroidery or backing needs |
| Step 2: Design and Digitization | Digitize and refine artwork for production | Create vector art, define color maps; for embroidery, digitize into stitch instructions; plan density, underlay, stabilizers; provide digital previews | Ensure legibility at various sizes and accurate color reproduction for both embroidery and print |
| Step 3: Materials, Backing, and Finishing | Texture, wearability, and installation method | Choose fabrics (cotton twill, felt, polyester, velvet); select backings (iron-on, sew-on, velcro); determine edge finishes and coatings; plan care | Backings and finishes affect durability and usability; ensure compatibility with laundering and application |
| Step 4: Production Methods—Embroidery vs. Printed Patches | Production approach and visual language | Embroidery emphasizes stitch count, pull compensation, color separations; printed patches use dye-sublimation or direct-to-film with gradients and photo-like detail | Choice impacts cost, lead times, care, and durability; testing on similar fabrics is essential |
| Step 5: Prototyping and Approval | Verification and stakeholder buy-in | Produce prototypes to test design, color accuracy, texture, and scale; gather feedback and refine design/materials | Prototyping reduces risk and provides tangible proofs for marketing and product teams |
| Step 6: Quality Control, Color Management, and Consistency | Consistency and accuracy across batches | Regular machine calibration, hooping checks, tension control; color management; finishing touches; robust QC checklist | Early detection of misalignments or color shifts prevents rework and delays |
| Step 7: Customization Options and Lead Times | Tailoring to client needs and timing planning | Offer multiple sizes/backings; mix embroidery and printed elements; plan for lead times based on complexity and quantity | Clear communication helps manage campaigns and launches |
| Step 8: Applications, Case Studies, and Creative Uses | Broad real-world applicability and storytelling | Patches used in sports, corporate branding, clubs, cosplay, and memorabilia; case studies illustrate impact | Shows how design and production planning elevate patches from badges to brand touchpoints |
| Step 9: Pricing, Sustainability, and Long-Term Partnerships | Cost considerations and partnerships | Material costs, production methods, complexity; sustainability choices; establishing reliable partners for ongoing needs | Long-term collaborations ensure consistency and scalability across campaigns |
| Common Pitfalls and How to Avoid Them | Risks and mitigation strategies | Color mismatches, unsuitable backings, rushing prototyping; mitigate with color proofs, appropriate backing, and staged reviews | Proactive testing and staged approvals reduce errors and delays |
Summary
Conclusion