
Embroidered patches are small, durable design elements that can instantly elevate clothing, bags, hats, backpacks, and accessories, adding texture and a dash of personality. They’re a timeless way to express personal style, brand identity, or a favorite hobby without committing to major changes. This guide highlights the core building blocks of patches, including their stylistic options and practical applications for everyday wear. Whether you’re a hobbyist, a designer, or a small business owner, you will gain practical tips for selecting, applying, and caring for patches. From classic badges to modern shapes, patches offer a personal touch that remains durable through washes and everyday wear.
In other terms, these tiny fabric emblems function as adaptable badges that can be heat-activated, sewn, or attached with removable fasteners on jackets, bags, hats, and a variety of fabric surfaces. Common terms include patch backings. For practical purposes, consider backing options, attachment methods, and embroidery traditions rather than focusing on labels, patterns, or marketing buzzwords. If you want a permanent fix, consider a traditional sewn-on approach backed by careful stitching and appropriate fabric preparation. DIY projects can still turn artwork into wearable statements, offering a flexible path for personal use or small-scale merchandise. These terms are used by crafters, designers, and brands alike to describe the same concept from different perspectives.
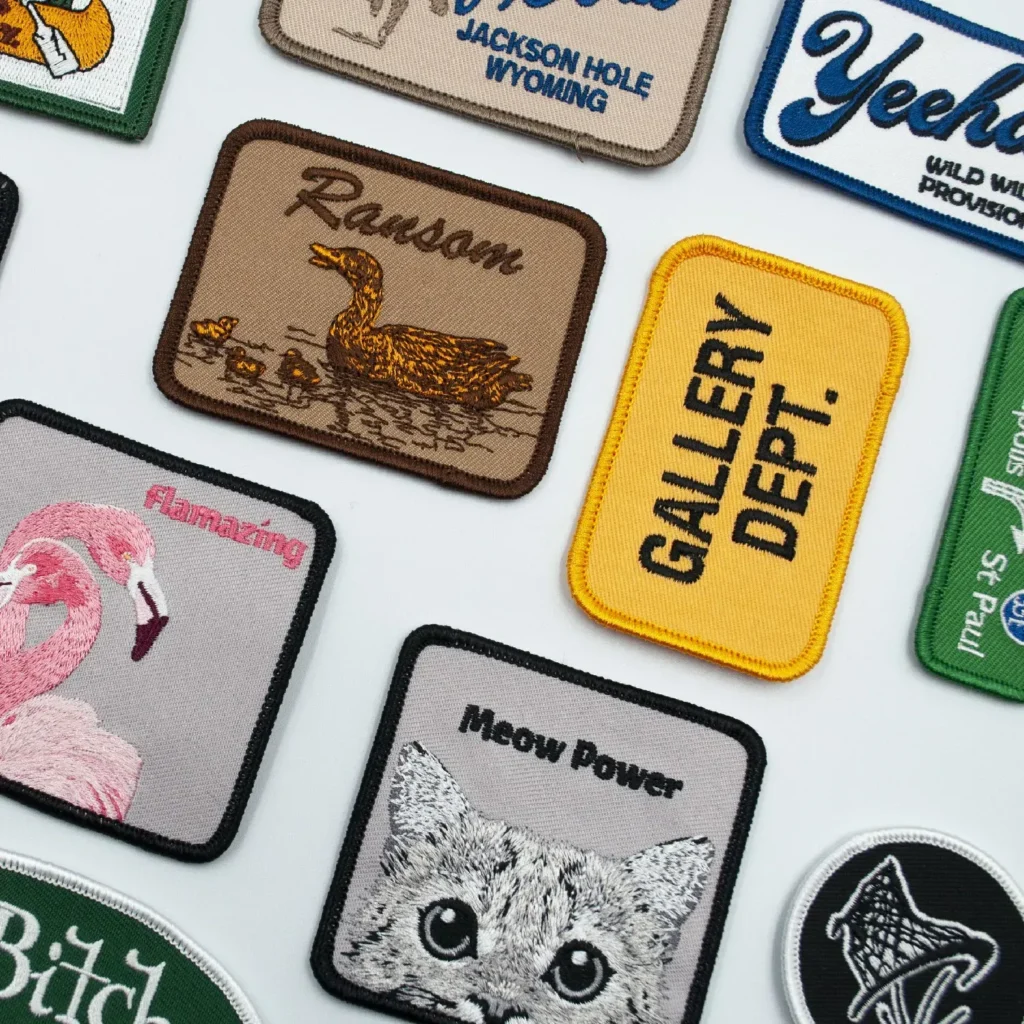
Choosing Patch Styles for Distinctive Looks
Patch styles offer a spectrum from timeless classics to contemporary silhouettes, allowing you to tailor a patch to your garment. Classic patch styles include circular, shield, and rounded-rectangle shapes with dense embroidery and a clean satin or merrow border. Novel shapes, stars, animals, and die-cut borders expand the concept of a patch, while layered embroidery adds texture and depth to the design.
When selecting patch styles for a project, consider the purpose (branding vs personal flair), the fabric weight, and how color, thread count, and border affect legibility. A minimal monochrome patch conveys a sleek aesthetic, while color-forward designs invite bold identity. By aligning patch styles with the garment’s vibe, you create a cohesive look that’s versatile across jackets, bags, and hats.
Patch Backings Demystified: Sew-On, Iron-On, and Alternatives
Patch backing options determine how a patch is attached and how it withstands washing and wear. Sew-on backings require stitching and provide robust durability for frequent laundering. Iron-on backings rely on heat-activated adhesive, enabling quick application but may need reinforcement on stretch fabrics or during repeated washing.
Other options include heat-transfer backings for strong bonding with a heat press, Velcro-backed patches for removable interchangeability, and glue-back backings for temporary placements. Choosing among these depends on fabric compatibility, desired permanence, and whether you want the patch to be swapped between items.
Embroidered Patches: Iron-On vs Sew-On Methods for Everyday Wear
Embroidered patches present a practical study in applying different attachment methods. iron-on patches deliver convenience for fast customization on sturdy fabrics, while sew-on patches offer long-lasting security that stands up to washing, abrasion, and repeated wear.
For heavy movement or professional uniforms, a hybrid approach—using an iron-on patch as a starting bond and adding edge security with hand or machine stitching—often yields the best balance of ease and durability.
DIY Embroidered Patches: From Concept to Creation
Starting with concept development, you can translate artwork into embroidery-ready designs by digitizing the image, choosing fabric, stabilizer, and thread colors. Drafting a patch layout on paper or in software helps anticipate size, placement, and how stitches will layer.
Tools like a home embroidery machine or hand-stitched kits empower hobbyists to produce professional-looking results. Planning, color testing, and sourcing durable patch backings or suitable fabrics set the foundation for successful DIY embroidered patches.
Embroidered patches for Branding and Personal Expression
Embroidered patches can build brand identity on apparel, bags, and team uniforms, or serve as a personal signature. To maintain consistency, align patch styles across product lines and ensure color matching—especially when producing corporate patches—while selecting durable patch backings.
Beyond branding, patches tell stories—limited editions, regional motifs, or collectible series—that invite engagement and sharing. Layer patches thoughtfully, consider placement, and weave in color palettes that support the narrative across collections.
Care, Longevity, and Storage of Patches
To preserve appearance and stitching, follow washing guidelines: turn garments inside-out, use mild detergents, and avoid bleach or high heat that can fade threads or loosen borders.
Drying should be air-dried when possible; if machine drying is necessary, select a low heat setting and use a garment bag to reduce friction. Regular checks for loose borders and occasional touch-ups with backstitches help maintain a crisp look, while storing patches flat or in a patch album keeps them from curling over time.
Frequently Asked Questions
What role do patch styles play in embroidered patches?
Embroidered patches come to life through patch styles, which shape their look—from classic circular or shield shapes to die-cut novelty forms. Layered embroidery and decorative borders add depth, while color choices (monochrome vs color-forward) set the mood. The style you choose should align with whether you’re prioritizing branding, personal expression, or a specific fashion aesthetic.
What patch backings are available for embroidered patches, and how do I choose between sew-on and iron-on options?
Patch backings determine how patches attach and how durable they are through wear and washing. Sew-on backings require stitching for a long-lasting hold, while iron-on backings use heat-activated adhesive for quick application. Other options include heat-transfer, Velcro-backed, and glue-backings; choose based on fabric, wash expectations, and whether you want removability or permanence.
What is the difference between iron-on patches and sew-on patches, and when should I use each?
Iron-on patches bond to fabric with heat, offering fast placement but potential heat sensitivity on delicate fabrics. Sew-on patches are stitched on, providing robust durability during washing and heavy wear. For high-motion garments or delicate fabrics, consider a hybrid approach or favor sew-on for longevity.
Can I create DIY embroidered patches at home, and what steps should I follow?
Yes, DIY embroidered patches are very doable at home. Start with a simple concept, then digitize or sketch the design for embroidery, select appropriate fabric and stabilizer, choose thread colors, and decide on a backing. Use a home embroidery machine or hand-stitching, test on scrap fabric, and plan the patch layout for future wear and washing.
How should I care for embroidered patches to keep them looking new after washing?
Caring for embroidered patches is about gentleness and protection. Turn garments inside-out, use mild detergents, and avoid chlorine bleach. Air-dry when possible; if machine drying is needed, use low heat and, for extra protection, a garment bag. Regularly inspect borders and re-stitch any loose areas to extend life.
How should I choose patch styles and patch backings for branding versus personal expression?
Define the goal first: strong branding may require precise color matching, durable stitching, and stable patch backings, while personal expression can embrace bolder patch styles and creative backings. Consider fabric compatibility, size, and placement to balance impact with wearability. Select patch styles and patch backings that meet both durability needs and the visual identity you want to convey.
| Aspect | Key Points |
|---|---|
| What are Embroidered Patches? |
|
| Patch Styles |
|
| The Backing Matters |
|
| Applying Embroidered Patches |
|
| Creative Uses |
|
| Design and Selection |
|
| DIY Embroidered Patches |
|
| Care and Longevity |
|
Summary
Embroidered patches offer a versatile, durable way to personalize clothing and accessories. They empower you to express personality, brand identity, or passions without permanent alterations. By exploring patch styles, backings, and care, you can select designs that fit your fabric, mood, and lifestyle—from classic, polished looks to bold, DIY-inspired statements. Embrace patch layering, color coordination, and thoughtful placement to transform everyday items into distinctive, story-filled pieces.